Posting the Results On-Line
Creating a full featured event results web page, or Results Web App as we call it, is just one click away. This task simply creates all of the data, scripts and HTML needed in a folder. All you will need to do is post this Web App to our web site. Options include:
- Saving the results as a Web App to your hard disk for uploading with a third party FTP application
- Publishing LIVE event results during the event with Finish-Time LIVE.
Finish-Time creates a Web App using Twitter Bootstrap, jQuery and AJAX to present the event results on your web site. A JavaScript enabled web browser is required for visitors to view the results.
- Microsoft Edge Browser
- Apple Safari 9+
- iOS 10.0+
- Firefox 11+ (including Firefox for Android)
- Chrome 16+ (including Chrome for Android)
- Opera 68+
- Brave Version 0.63.55
Customizing the Results Web Application
Included in the current install are ten custom color schemes for you to pick from.
- Autumn
- British Racing Green
- Finish-Time (Default)
- Dark
- Modern
- Muted Tones
- Neon High Contrast
- Red White and Blue
- Royal Blue
- Warm Tones
To Customize your Results Web App
- Choose View > Web App Layout, or if it is already open, click the Web App Layout tab.
- Choose the Style Sheet that best matches your web site, and the preview will refresh.
- You have the option to only include the drivers first name, or their full name. The default is First Name only.
- To include an optional link, i.e. a link back to your home page or to a table listing all of your current results, enter the full path in the Link field and enter a caption. This menu will now appear on the top left of the Web App.
- Click the Course Map tool bar button to choose a JPG or PNG image of the current course map for the Web App to display to your drivers. Images must be less than 2 MB in size.
Export the Results as a Web App
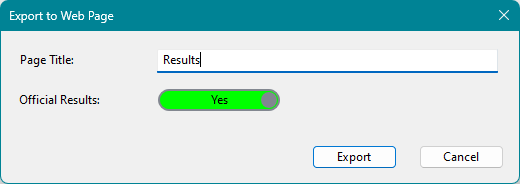
- Choose File > Export Results > Results Web App
- Enter the Web App name, then click Export.
- Choose the location on your computer to save the web app.
Posting the contents of this folder to your website can be handled by your webmaster. It is necessary to keep the files found in the exported folder together. You can rename this folder what ever you wish, but the contents should be kept intact and uploaded to your website
Exporting Season Points
The Season Points may be exported in two different ways.
- Export to CSV
- Export to Web
Select View > Season Points if it is not in view already. Clicking the Export tool-bar button will reveal your two export options.
Points as CSV file
Enter a filename and choose where you want to save the exported CSV type points table.
Points as Web Page
- The Points Web Page dialog appears, enter the Title and any Notes about the Points Page you find appropriate. The Page Title and Notes will appear at the top of the web page.
- Click OK to commit the Title and Notes.
- Enter a filename and choose where to save the HTML file.
The Points Web Page is saved as a single HTML file that can uploaded to your web-site.
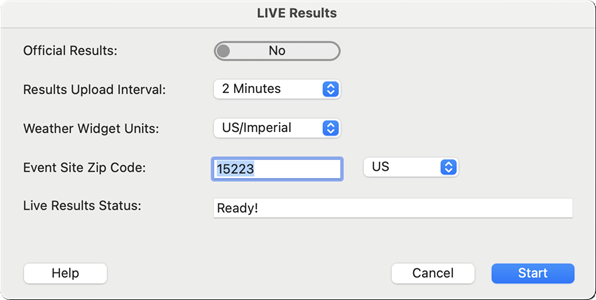
Starting Finish-Time LIVE
- Confirm that you configured Finish-Time LIVE
- Select Tools > Finish-Time LIVE
- Choose the Upload Interval in minutes.
- Enter the Event Site Zip Code and the Weather Widget Units for your region, this will include the current weather conditions for the Event Site.
- Then click the Start button.
Remote Access
Remote Access is a subscription-based option that extends some of Finish-Time Desktop's functionality to one or more designated users so that they can assist with driver registration, event management, and Technical Inspection through any internet enabled device like a smart phone or tablet.
- Microsoft Edge Browser
- Apple Safari 9+
- iOS 10.0+
- Firefox 11+ (including Firefox for Android)
- Chrome 16+ (including Chrome for Android)
- Opera 68+
- Brave Version 0.63.55
What’s Needed
- The host computer (your PC running Finish-Time) will of course require internet access, and any of the designated users will need to log in to our web site with proper credentials at https://finish-time.com
- In most cases internet access would be via a data plan with a cell phone carrier. We developed Remote Access with minimum data usage and security in mind. During an event, data usage should only be around 20-60 megabytes with one user connected. However, with limited use data plans, data traffic can be reduced further, see configuration for details.
Remote Access Configuration
Although multiple event officials can use Remote Access using any Internet Enabled device, only one installation of Finish-Time can be enabled. This is achieved by "pairing" the timing computer to your Club’s account at https://finish-time.com that you created when you first downloaded and purchased Finish-Time.
Be sure that you are using the same PC that will be used during the event. This is important, you are about to "Pair" this PC to your account, therefore only this PC and installation of Finish-Time will connect to our server.
- Log into your Club’s account at https://finish-time.com
- Click you email menu at the top right side of the web page and choose My Account
- Click Remote Access, your Subscription renew date and Paired To status should be visible. Remote Access requires a subscription, if your subscription has lapsed, please renew before going forward.
- Start Finish-Time on the computer that you will be using at the event site.
- In Finish-Time, click Tools > Finish-Time Remote to open the Remote Access dialog.
- Your Subscription might be blank or not match the subscription date on the web site, that’s OK and will after you pair the device.
- Click the Pair button.
- Enter your account User Name and Password.
- Click OK.
Now, your timing computer is paired to your clubs account. Going forward, when Remote Access is enabled, event officials will have access to via their smart phone. Pairing must only be performed once. Unless you change/upgrade your timing PC.
Using Remote Access
Access should only be made available to official event personnel. They will need the log in credentials to your Club’s account on our web site.
Click Tools > Finish-Time Remote.
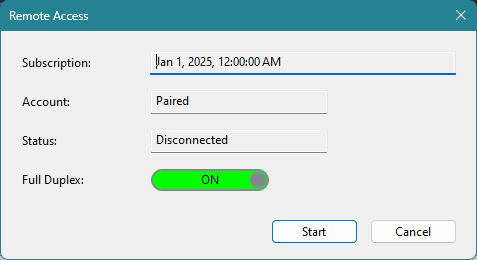
Full Duplex will enable push notifications to your browser to keep any browser connected in full synchronization with Finish-Time. Although this does increase your data usage and over-head on the Timing PC, it is minimal. With a limited data plan, you can turn this off here. Keep in mind that on-line users will not get updates.
In your web browser, go to http://www.finish-time.com and log in to your account. Click Remote in the menu at the top of the page, if Finish-Time is connected, you should see the Remote Home page.
Remote Access maintains a web socket connection with our server, therefore, response is dependent on the internet connection between your timing laptop, our server, and your smart phone. Latency between these connections will affect application response.
- Home
- This is the Home Page of the Remote Access App. It lists the event properties and the last car to finish.
- Event Properties
- Event Date, Location, Name, etc. can be changed here and are updated upon clicking Save Changes.
- Drivers
- Access the driver database to Register drivers for the event, or edit their results.
- Reconcile
- Event cash reconcilement function.
- Bump
- Bump classes if needed.
- Help
- Detailed instructions for users regarding Remote Access.
Driver Registration
Remote Access Driver Registration is the functional equivalent of Finish-Time Driver Registration, accept for a few differences with the User Interface, the procedures are the same.
There are 6 Toolbar Buttons located near the top of the Remote Access - Drivers page.

- Drivers List
- New Driver
- Edit Driver Registration
- Edit Driver Results
- Delete Driver
- Show All/Registered Drivers
Drivers lists all current drivers in the database, just like the Run List in Finish-Time. To register a driver listed here click on their CarID update their class, etc. Then click Update
If the driver is not listed, Click the New Driver button (#2 in the image above). Enter their CarID, choose the class in the Enlisted menu then enter their Name, etc. To commit the driver to the database, click the Save button at the bottom of the form.
...
Exporting the Results in text format
The event results may be exported in Tab-Delimited Text format, or as Comma Separated Values (CSV) format for use with a third party database or spread sheet for further processing.
To export the Results
- Choose File > Export Results
- The file save dialog box opens, choose a file name and the format and then export the results.