Event Manager
Flexibility is a core design goal of Finish-Time. Whether you are an SCCA club or an independent sports-car club, you can shape Finish-Time to match your needs.
The Event Manager is the heart of the season database. Standard classes, bumping rules, trophy settings, and competition points for every event in the season database are configured here.
Open the Event Manager with Tools > Event Manager.
Select an item on the left side of the window to display its settings.
In this article
- Home
- Registration
- Standard Classes
- PAX Classes
- Class Categories
- Worker Positions
- Standings and Points
- Auto Bump
- Penalty
- Live Results
Home Event Manager
The Home panel is where you create and open every competition event for the season.
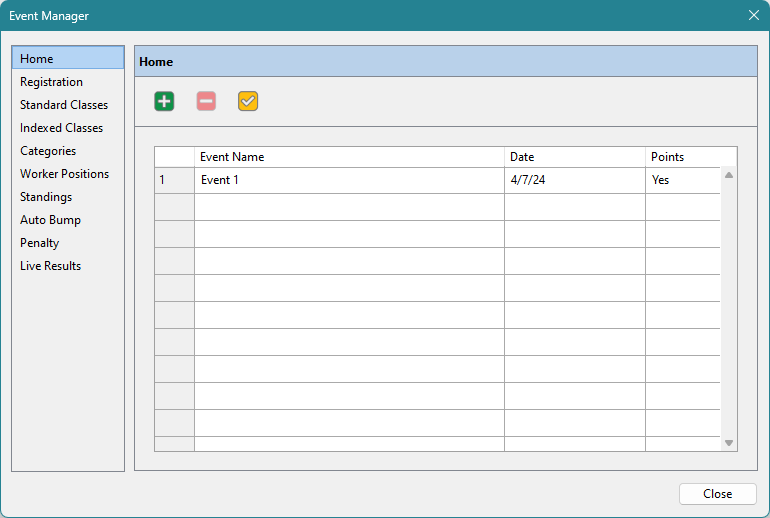
To open an event, select it and click the  toolbar button. Double-clicking the event also opens it.
Click  to start a new event.
Registration Event Manager
Enter the Member and Non-Member Fees here. During registration you can set each driver’s membership status, and at the close of registration you can print a final income report. These values also appear on the Event Report printout.
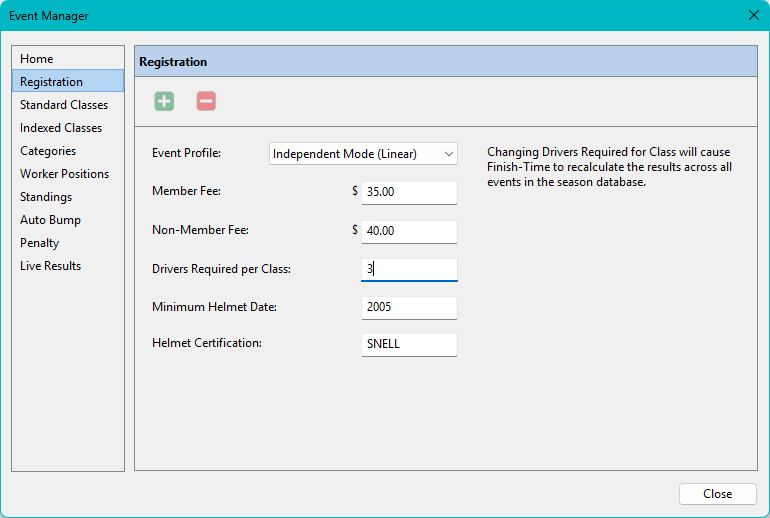
The Event Profile menu configures the Auto Assign and Schedule functions for all New Events. SCCA Mode (Grid) enables Grid Staging and Independant Mode (Linear) enables single line, numeric staging.
Enter the number of Drivers Required per Class. Finish-Time uses this number to build the list of required bumps.
Standard Classes Event Manager
Before you can register a driver in a class, that class must appear in the Standard Classes list. Finish-Time matches each driver’s declared class against this list when registering and staging drivers for every event in the season. You do not have to enter PAX indexes, but you must list every class your club recognizes.
New classes are inserted below the currently selected class (similar to an Excel insert) or added at the bottom of the list. Drag and drop to reorder them. The order shown here determines the order of drivers when the Drivers List is grouped by class.
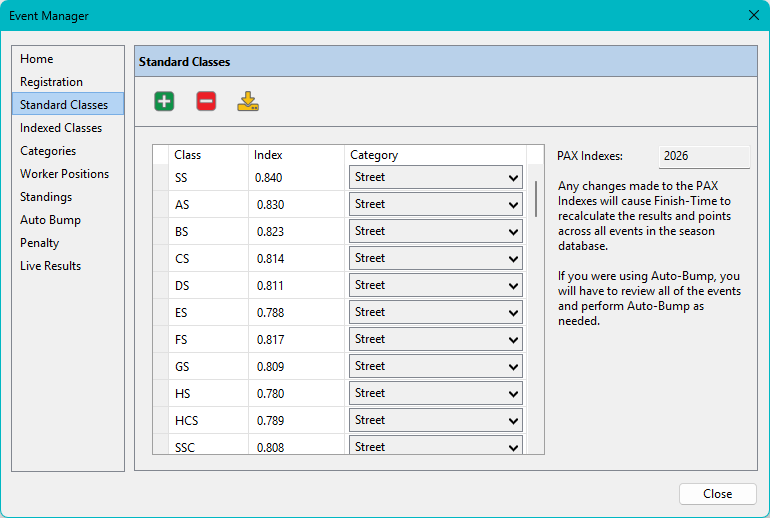
Click to add a class, or  to delete a
class and its PAX index.
to delete a
class and its PAX index.
Use the Category menu to assign a Class Category that best describes the class.
To change a class name or PAX index, click once, then click again and type the new value.
Obtaining the Latest Indexes
Yearly updates to the PAX indexes are available to Finish-Time users shortly after the Chicago Region SCCA
releases them. You can update them here with one click or enter them manually. Click
 to check online for new PAX indexes.
PAX Indexed Classes Event Manager
You can add additional classes in which each driver’s best time is multiplied by the PAX index of their standard class. Standings within the indexed class are then determined solely by the resulting PAX times. (These multipliers are the same PAX values you entered in the Standard Classes list.)
If your club runs a vintage class (VIN) that mixes cars from several standard autocross classes, each driver’s best time is still multiplied by the PAX index of their standard class. The winner of the VIN class is simply the driver with the lowest PAX time.
Click to add, or to delete a PAX
Indexed Class.
Use the Category menu to assign a Class Category that best describes the class.
To rename a PAX Indexed Class, click the name once, then again and type the new value.
Reorder the list by dragging and dropping. The order here controls the order of the Class drop-down menu in Registration.
Categories Event Manager
Add or delete categories and associate them with Standard Classes and PAX Indexed Classes.
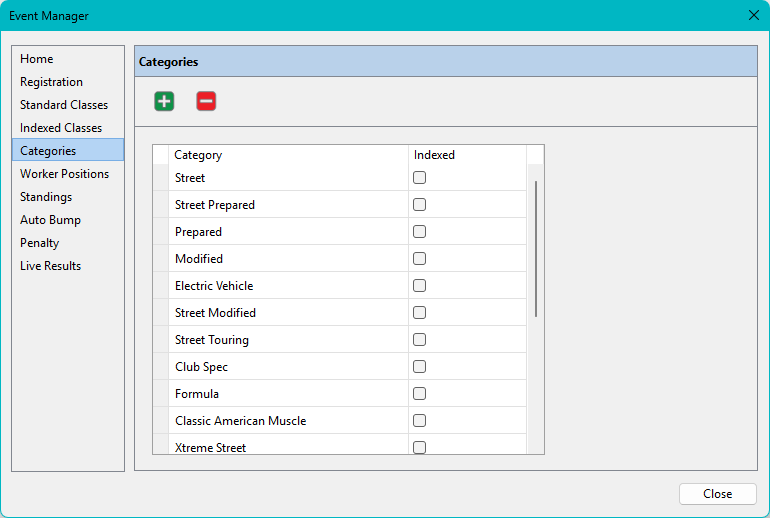
Click to add, or to delete a
category.
Rename a category by clicking once, then again.
The Indexed Check Box determines if the Category (of classes) are PAX Indexed or not.
Reorder categories by dragging and dropping. The order shown here controls the order of classes in printed and web results and is also used when grouping classes for bumping.
Worker Positions Event Manager
The Worker Positions listed here appear in the Registration panel and the Worker Assignments panel. This feature is optional, but it provides a convenient way to assign event workers. It also supports full Auto-Assign.
Click to add, or to delete a Worker
Position.
Reorder the list by dragging and dropping. The order here determines the order of positions in Registration and in the Worker Assignments window.
To rename a position, click once, then again and type the new value. Click the Exclusion check box to exclude the driver from working.
The Exclusion Check Box determines if the driver with this assignment should be excluded from any Work Group.
The Cache Check Box determines if the driver's assignment is saved or cached for saved for their next event.
Standings and Points Event Manager
When results are published, Finish-Time shows class placements (1st, 2nd, 3rd, etc.) for up to ten cars per class and calculates season points according to the rules you configure here.
Enter the number of cars required for a trophy at each placing. Leaving a field blank or entering zero means no trophy is awarded for that place.
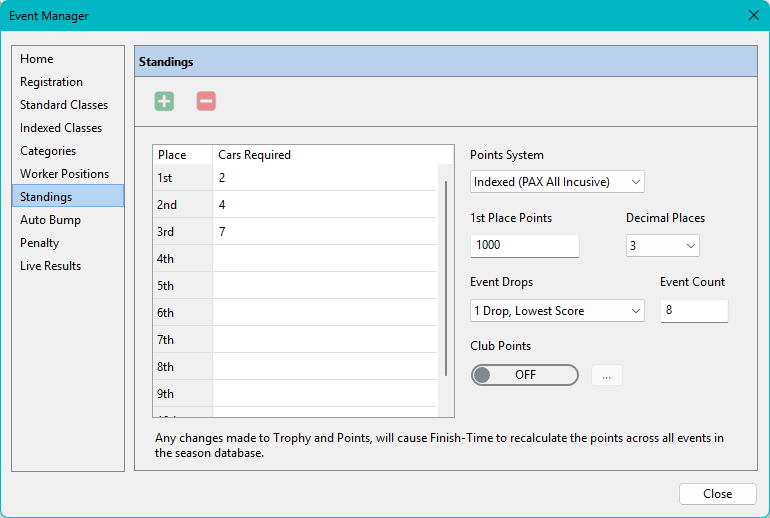
Example: If your club requires three cars in class for a first-place trophy and four cars for a second-place trophy, enter 3 in the 1st field and 4 in the 2nd field.
Points Calculation
You have four options for event points:
- None
- Fixed
- Indexed (Raw by Class)
- Indexed (All Inclusive, By Class)
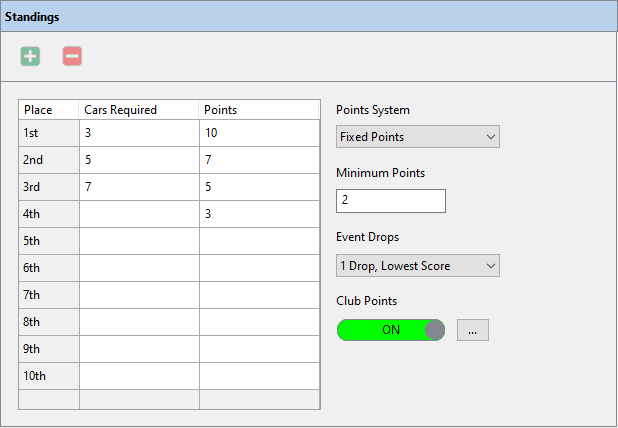
Fixed Points
The Fixed Points system awards the points you enter for each place. Minimum Points is the lowest number of points awarded regardless of finishing position.
Indexed (By Class)
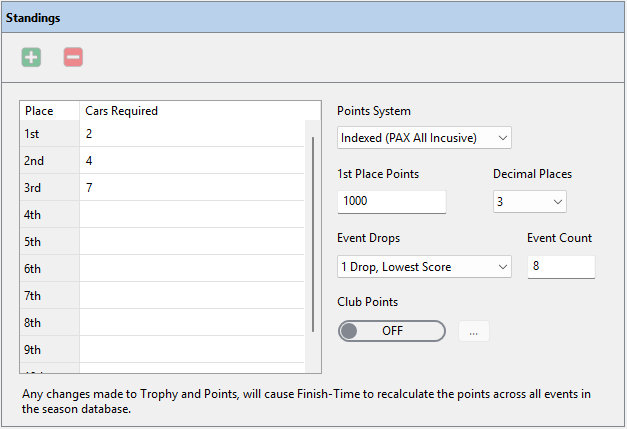
With Indexed (Raw by Class), the first-place driver in each class receives the value in the First Place Points field.
For each subsequent place, Finish-Time calculates points from the difference between that driver’s best raw time and the class winner’s best raw time. The difference is divided by the later driver’s raw time, then scaled by First Place Points and subtracted from First Place Points. The same calculation is applied to third place, fourth place, and so on within each class.
Indexed (All Inclusive, By Class)
With Indexed (PAX All Inclusive, By Class), the overall first-place driver (lowest PAX time across all classes) receives the value in the First Place Points field.
For each subsequent place, Finish-Time uses the difference between that driver’s best PAX time and the overall winner’s best PAX time. The difference is divided by the later driver’s PAX time, scaled by First Place Points, and subtracted from First Place Points. The same calculation is applied to every remaining driver across all classes combined.
Use the Decimal Places drop-down to set the precision you need.
Club Points
Club Points is optional for clubs that track non-competition participation such as meetings and event chairmanship. Enable it with the Club Points switch.
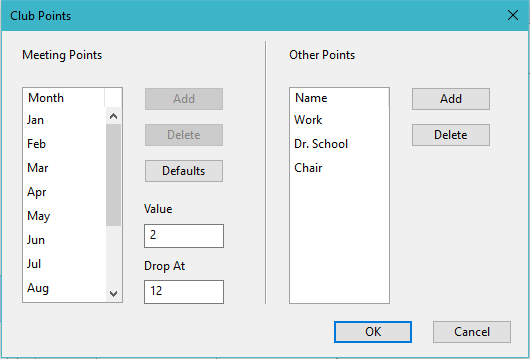
Click the ellipsis button to open the Club Points options.
Meeting Points
Click Default to pre-load each month starting with January. You can edit the list or add more entries.
Value is the number of points awarded for attending a meeting. Meeting points are assigned with check-boxes in the Points panel.
Drop At controls when one meeting is dropped from the total. Entering 12 drops the 12th meeting for members who attend all twelve. Entering zero means no meetings are dropped.
Other Points
Enter any other non-competitive points your club tracks. No value is stored here; the actual points are entered later in the Points panel.
Auto Bump Event Manager
Auto Bump supports both Traditional Bump and Indexed Group bumping. Traditional Bump is rarely used today. Indexed Group bump moves any competition class that does not meet the minimum driver count into an indexed group (or class).
By default Auto Bump is set to Traditional and includes a working sample schedule (shown below). You can replace the sample with your own bump tables.
How Indexed Group Bump works: the process starts with the top-most Category and walks through each Standard Class in that Category, bumping cars into the associated Indexed Group until the Drivers Required per Class requirement is met.
Details for the Traditional Bump Tables
Here is a mapped example of the default bump table, using the Street Category.
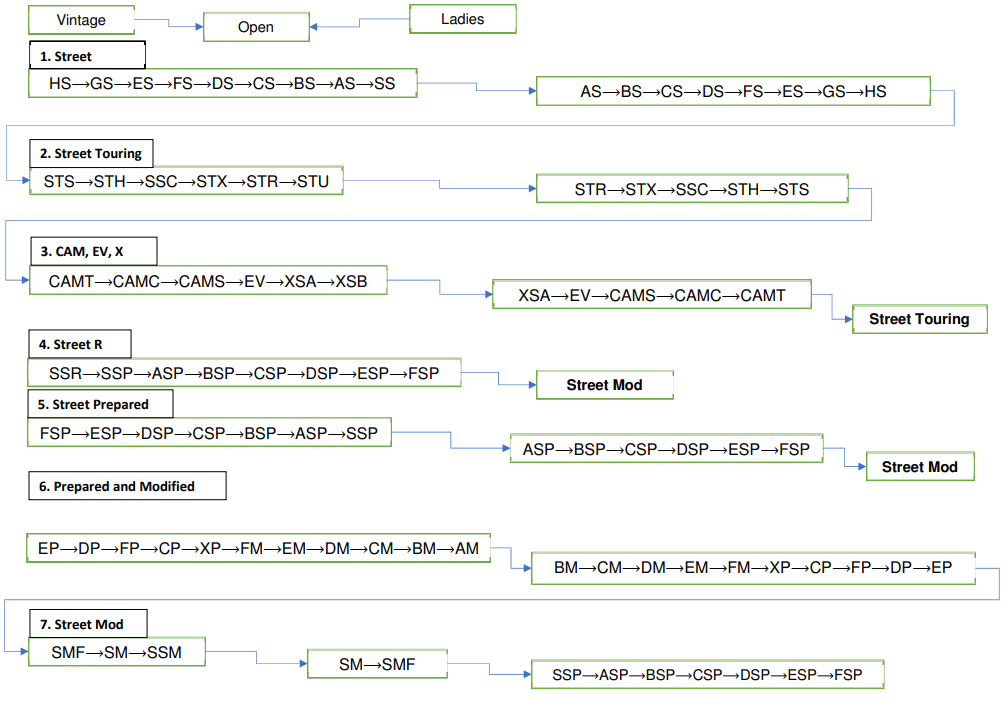
The table begins with HS, bumps upward to SS, then reverse-bumps back. If the Drivers Required per Class count is still not met, the process continues through Street Touring, Classic American Muscle, Electric Vehicle, and finally stops at Extreme Street. The sequence in this example is based on PAX index.
The classes for the Street Category bump would therefore be entered as:
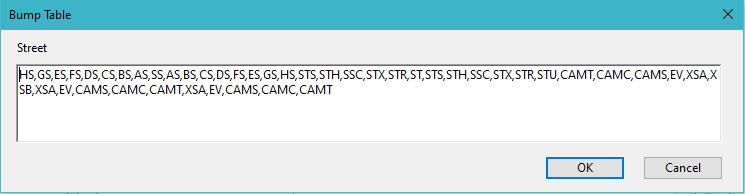
HS,GS,ES,FS,DS,CS,BS,AS,SS,AS,BS,CS,DS,FS,ES,GS,HS,STS,STH,SSC,STX, STR,ST,STS,STH,SSC,STX,STR,STU,CAMT,CAMC,CAMS,EV,XSA,XSB, XSA,EV,CAMS,CAMC,CAMT,XSA,EV,CAMS,CAMC,CAMT
To Edit the Traditional Bump Table
Double-click the table to open the editor and change the default values. Always separate each class with a comma.
To Edit the Indexed Group Bump Table
Finish-Time includes standard Categories linked to their Standard Classes. Category order determines the Auto Bump sequence.
To add new indexed groups:
- Add the Categories:
- Street Bump
- Street Touring Bump
- Unlimited Bump
- Hoosier Bump
- Select the Indexed check box for each Category.
- Add and link these Indexed Classes:
- SB → Street Bump
- STB → Street Touring Bump
- UB → Unlimited Bump
- HB → Hoosier Bump
- Open Auto Bump and build the Indexed Group Bump matrix:
- Click Add (+) to create a new entry.
- Select a Category.
- Assign its Indexed Group.
To change the Category order
Drag and drop each Category into the desired position.
Penalty Event Manager
The value entered here is the time, in seconds, added for each pylon penalty. Valid entries are 0 to 9 seconds. The default is 2 seconds and can be changed at any time. Each pylon assessed to a driver is multiplied by this value.
Live Results Event Manager
Finish-Time LIVE posts autocross results to a web site while the event is in progress. Uploads occur automatically at the interval you choose. Participants can follow live results, work/grid assignments, and the course map. On-site internet access to your web server is required.
Prerequisites for Finish-Time LIVE:
- A web server running PHP 7.x or later.
- FTP access to the web server (needed only for the initial upload of the Web Application, not for posting live results).
- Working knowledge of FTP software, or an upload tool in your host’s admin panel.
- Read and write permission on the directory that holds the Web App. This is often already true on Linux servers but may need to be set on Windows Server. Finish-Time will warn you if the requirement is not met.
Configuring Finish-Time LIVE
- Select Live Results.
- Enter the Live URL where participants will view the results.
- Click Create App\ldots and save the Live Results App to your hard disk.
- Using any FTP client, upload all files from that folder to the location on your club’s website that will host the LIVE results.
- After the upload, click the Reload button next to the Status field. It should read Ready. If it does not, see the status messages below.
Example URL
http://results.finish-time.com/LiveDemo
Finish-Time LIVE Status

The URL points to a directory that does not contain the Finish-Time LIVE App.

The Finish-Time App at this location is an older version. Delete all content at the location and follow the steps in Configuring Finish-Time LIVE to create an updated App.
Going forward, Finish-Time will update the JavaScript as needed. You will not have to repeat this procedure unless a major change is made to the Web App.

The server is running an older PHP version, or PHP is disabled. Finish-Time LIVE requires PHP 7.0 or later. PHP is supported on both Linux and Windows servers. Most hosts provide a control panel (cPanel, etc.) for PHP configuration.

Finish-Time LIVE scripts require both read and write permissions on the web server. The write test failed. Granting read/write access is normally handled through the host’s admin panel.