Configuring Finish-Time
Finish-Time is a very flexible Autocross timing and publishing application, and is easily configured for your needs. Settings that are event independent, such as the type of timer you are using, serial port that the timer is connected to are configured here.
- Windows:
- Select Edit > Options.
- Mac OSX:
- Choose Finish-Time > Preferences.
Navigate to each option by choosing the Item listed on the left of the window to reveal each Item’s setting. Listed below is a brief description of each Item. It is not necessary to click OK every time you make a change in every item in the list. All changes are implicit.
- General
- Finish-Time UI settings and time display format.
- Timer
- Select and configure your Timer model and Serial Port.
- Barcode Scanner
- Select and configure a Barcode Scanner serial port for Barcoded Staging.
- Web
- Pairing your PC to your user account at finish-time.com for Finish-Time for Web. (Requires a subscription.)
- Updates
- Enable or disable Finish-Time application updates and check for new PAX Indexes.
General
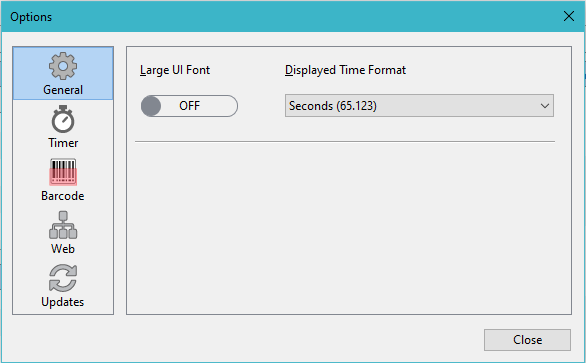
Large UI Fonts
Upon installing Finish-Time, the user interface defaults to the Host Operating System’s font size. Click the Check Box to use a larger font.
Displayed Time Format
Choose how Finish-Time displays each timed run:
- Seconds (65.123)
- Minutes and Seconds (1:05.123)
Timer
Timer configuration is found in the Preference/Options window.
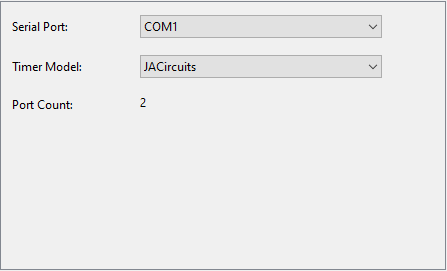
Finish-Time supports the JACircuits, RaceAmerica AC4, RaceAmerica T-Link, Chronomix CC737, and Farmtek Polaris timers.
Your timing hardware communicates with your PC using an RS-232 serial port. Sometimes referred to a COM Port on Windows.
Most PC notebook computers do not include an RS-232 serial port anymore. Finish-Time has been thoroughly tested using a both Keyspan and IOGEAR USB to RS-232 Adapter with Windows and Macintosh. Other USB devices might work, but our testing has shown that some low-cost converters are not reliable and do not accurately emulate the RS-232 protocol.
When installing the USB driver for any RS-232 converter, be sure to follow the manufacturer’s installation instructions exactly for the host Operating System.
Always use quality cables to ensure a tight, noise free connection.
Select the serial port in which the timer is Connected To and the Timer Model that you are using.
Test the configuration by turning on the timer and pressing the "Start" and "Stop" buttons on the timer. If the port is active, the time should appear in the "Finish" panel.
Barcode Scanner
Barcode Scanner configuration is found in the Preference/Options window.
Barcoded Staging requires a hand held barcode scanner with an RS-232 Serial Port or WIFI (TCP/IP) Interface. There are a lot of inexpensive scanners on the market with a convenient USB interface, but most of these devices install themselves as a second Keyboard. Sending the barcode to wherever the text cursor happens to be. That’s fine for capturing barcodes into a spread sheet, but will wreak havoc in Finish-Time, or any other application that happens to be in the foreground on the host computer.
In development, we used a Symbol brand hand held barcode scanner model RS2208 complete with a 9-pin RS-232 Serial Port connector. Although this model supports multiple interfaces, including USB as RS-232 with the appropriate driver from their web site. This model physically connects to the host PC, there are Bluetooth models from Symbol that connect to the host the same way. Wireless or Bluetooth, although is more expensive, would be ideal.
In field testing, we used a Symbol brand model LS4278 Bluetooth Wireless hand held barcode scanner with RS-232 serial port cable. It works well, but there is a 20 foot distance limitation with that device.
Most PC notebook computers do not include an RS-232 serial port anymore. (COM Port on PC Compatibles) Finish-Time has been thoroughly tested using a Keyspan USB to RS-232 with Windows and Macintosh OSX. Other converters might work, but our testing has shown that some low-cost converters are not reliable and do not accurately emulate the RS-232 protocol.
- Baud Rate
- 9600
- Parity Type
- None
- Stop Bit
- 1
- Data Bits
- 8
- Hardware Handshake
- None
- Software Handshake
- None
- Beep on BEL
- Enabled *
- Barcode Type
- Code 39
- Suffix
- CR/LF
- Operation Mode
- Socket
- Connection Type
- TCP
- Mode
- Server
- Port
- Between 1024-65535
- Beep on BEL
- Enabled *
- Barcode Type
- Code 39
- Suffix
- CR/LF
* Beep on BEL is optional, If you enable this function on your scanner, the scanner issues distinct double beep when it reads a barcode of a driver who is not registered, or a non-existing barcode.
Remote Access
Finish-Time Remote Access pairing/configuration is found in the Preference/Options window.
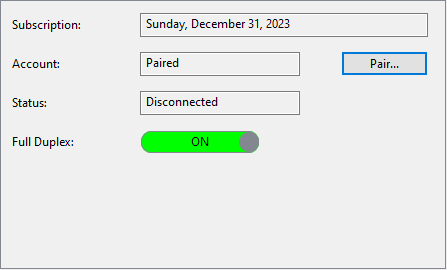
Remote access is a subscription based service that offers on-site remote registration, and results editing from any internet enabled device. Although you can assign one or more persons to log-in to your Club’s account at finish-time.com to handle event registration, etc. You must pair Finish-Time to the account. Only one installed and licensed installation of Finish-Time can be active. Pairing simplifies connecting to your account on race day.
First Time Use
Log into your account, click the account icon at the top of the page and choose my account. Then click the Remote Access button on the left side of the page.
With Finish-Time running on the same PC that you will be using at the event, click the Paring button, and enter your account user name and password. The PC should now be paired to your account. If pairing failed, confirm that you entered the correct password. Going forward, you will not need to perform this again, unless you change your password, or use a different PC.
Updates
Updates configuration is found in the Preference/Options window.
Finish-Time can check for new PAX Indexes and Application Updates on a Weekly, or Monthly basis. By default, this is turned off.
Okay, we get things wrong once in a while, Finish-Time logs any application errors to the hard disk. Enabling Push error logs to finish-time.com will send this log to our server so that we can diagnose any software bugs that we didn’t catch during development. We do not collect any personal information from your computer.
Supported Timers
JA-Circuits Timer (Second Generation)
Using a standard 9-pin Male/Female straight-through serial cable, connect the Male end of the cable to the port on the back of the timer labeled “COMPUTER”, and the Female end of the cable to one of the serial ports of your computer.
Special Functions
If a false finish occurs, press the RESET FINISH button on the front of the timer and Finish-Time will ignore the last finish and will move the driver that received the false finish back to the top of the Start List.
RaceAmerica AC4
Using the serial cable supplied with your timer, connect the Telephone-Type connector of the cable to the port on the back of the timer labeled “RS-232 Serial Printer”, and the 9-pin Female end of the cable to one of the serial ports of your computer.
The AC4 supports Seconds (999.999) and Minutes/Seconds (9:59.999). Although Finish-Time can display times in either format, it only accepts Seconds from the timer.
Special Functions
Finish-Time tracks both Start and Finish signals and highlights each car in the Stage List in Yellow as each car passes through the Start.
If a false finish occurs, press Continue Timer (keypad [7]). Finish-Time will ignore the last finish and will move the driver that received that finish back to the top of the Start List. This is used to handle false finishes received by the timer.
Race-America T-Link
Connect the T-Link unit identified as ID-Z to the serial port on the host PC using the 06-TL02 data communications cable supplied with your timer. Position both the ID-A and ID-B T-Link units as per the T-Link user manual. The T-Link timer hardware uses a data string protocol that Finish-Time will parse when data is received.
You can monitor the T-Link units battery condition and radio signals in the Accessory Panel on the right side of the main window. Select View > Accessory Panel > T-Link Radio and Battery Integrity from the main menu. If this option is disabled, you must first Configure your Timer.
Chronomix CC-737
You will need a special serial port cable to connect the CC-737 to a computer. This cable has a metal stereo phono plug on one end (for the CC737) and either a 9 or 25 pin ’D’ connector on the other. This part is no longer available, but instructions to build one are found on the internet. Finish-Time requires the CC-737 to be in CC Mode only and will not work with SP Mode.
Configuration
The Timer Model menu will reveal additional settings when you choose the Chronomix CC737. You must determine which channel will be used for the Start and Finish and configure Finish-Time accordingly. Typically the Start would be configured as Channel 01 and Finish as Channel 02. The start and finish Dwell Time alleviates false starts and finishes. This is a delay time in seconds factor used for both start and finish to prevent false trips. The default is 1 second.
Special Functions
Finish-Time tracks both Start and Finish signals and highlights each car in the Stage List in Yellow as each car passes through the Start.
Farmtek Polaris
Supports Farmtek’s JAC Normal, JAC Chrono, and RA T-Link Computer interfaces as described above.