Starting a New Event
Before going further, confirm that you have created a new Event Season Database and that it is currently open.
By adding a New Event to this Event Season Database means that they are linked together for season points calculations throughout the season. Therefore, they share attributes like the Standard Classes, Indexed Classes, etc. Moving the Finish-Time Database file from one computer to another maintains ALL of these attributes for the season.
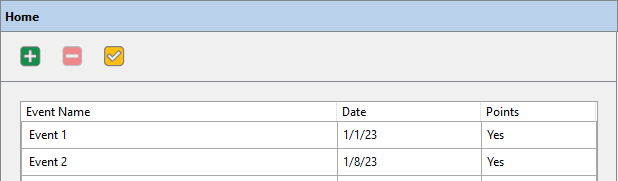
- Select Tools > Event Manager in the Menu Bar.
- Ensure the Home panel is selected from the menu on the left side of the Event Manger window. Then Click the
 tool-bar button.
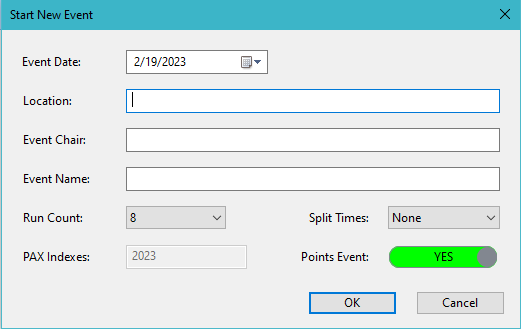
 - Enter the event Location, Chair, Name as above. Run Count is the number of expected timed runs each driver make. Split Times defaults to none, but with additional timing units, you can capture up to 2 split times between Start and Finish. Points Event defaults to YES. Choosing NO here will exclude the event from the final points tally. These attributes can be changed at any time.
- Click OK to confirm, the new event will be created. Then close the Event Manager window.
In this article
- Importing Drivers
- Event Properties
- Driver Registration
- Bumping Drivers to a different class
- Deleting Drivers
- Assignments
- Event Properties
Importing Drivers
Importing the drivers from MotorsportsReg.com eliminates the redundant re-entry of the same data from one event to the next during driver registration. You can even import from more than one source. Finish-Time’s data importing model confirms each driver’s CarID and Barcode are confirmed first before the driver is imported into the Event Database. Any duplicate CarID’s and Barcode’s will fault into a separate table for you to correct as needed.
To import drivers from MotorsportsReg
To facilitate quick, automated importing and driver registrations based on on-line payment status, you will need to configure a custom data report on your MotorsportsReg Admin account
- Select File > Import MotorsportsReg data....
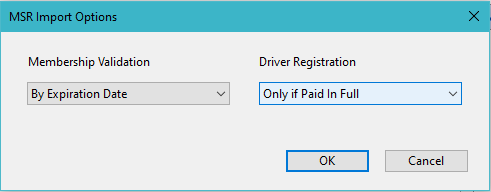
- The MSR Import Options dialog presents a choice of how you can verify each driver’s Membership Status of each driver in Finish-Time and if drivers should be registered based on payment or always.
- Click OK.
- Choose which data source in the Files of Type drop down menu. Your options here are *.csv (comma separated value) or *.txt (tab delimited text).
- Browse for and choose the file, then Click Open

Custom MSR Report for Finish-Time
MotorsportsReg.com has all of the data that Finish-Time needs to register a driver, you just need to create a custom Report to retrieve it. By following the instructions below, the Custom report you create will include the required data-fields Finish-Time uses for the best experience.
- Log in to your Motorsports.reg Admin account
- Navigate to your list of events and click "registrations" on any one of them
- Then click "Reports"
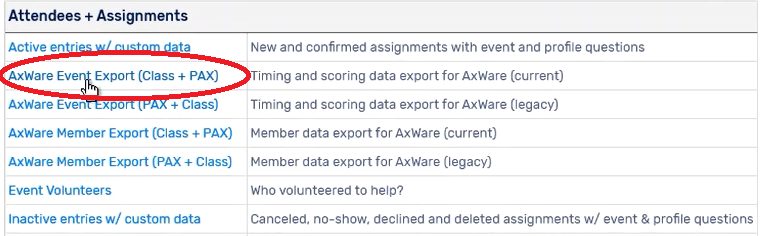
- Scroll down to "Attendees + Assignments", then click "AxWare Event Export (Class + PAX)"
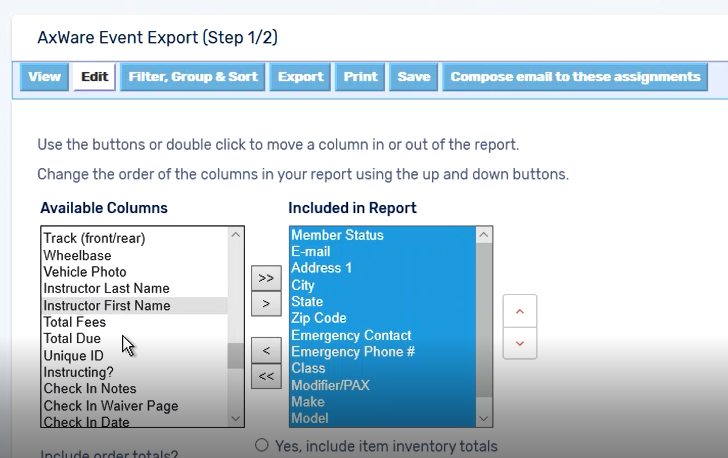
- Click the Edit button near the top
- Locate the "Included in Report" items, and delete them all.
- Locate the "Available Columns" and copy these items over to "Included in Report" They do not have to be in any particular order.
- Member Status
- Address 1
- City
- State
- Zip Code
- Emergency Contact
- Emergency Phone #
- Class
- Modifier/PAX
- Make
- Model
- Year
- No.
- First Name
- Last Name
- Paid in full?
- Member Types
- Mem. Expires
- Member #
- Unique ID
- Click the Save button
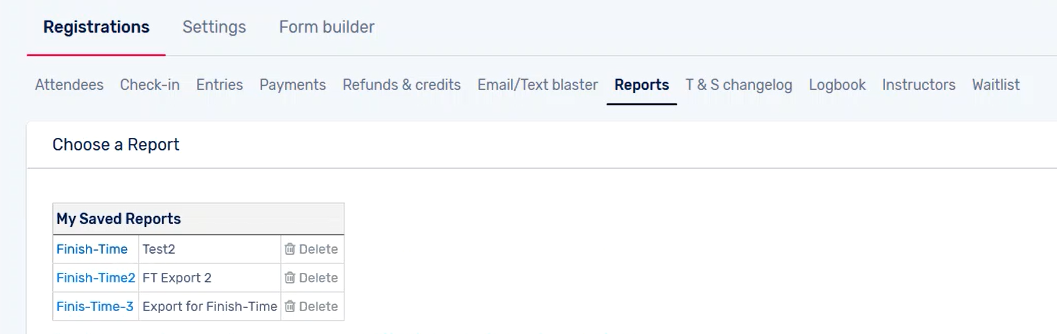
- Choose a unique name and update the description as you like, then click the red "Save Report" button.
- After saving, click "Back to Report List"
- Now, your custom "Finish-Time" report should be listed near the top under My Saved Reports. This new custom report (export) can be used for any of you events going forward.


Finish-Time's Importing Model
Finish-Time will confirm if there is a duplicate CarID and Barcode while importing MotorsportsReg data. As you continue to add new events, the drivers/members data will continue to grow in size, Finish-Time will maintain the rule that there can't be a duplicate CarID (Number/Class), or Barcode. We use an algorithm that compares the incoming data to the current to determine if there is a perfect match, or not. Our import model will fault the duplicates to the Import Fault table for you to correct as needed.
Import Faults
To view the faulted import data, select Tools > Resolve Import FaultsDriver Registration
Each driver is identified by their CarID; a unique key identifier that is used as a reference to stage drivers/cars during run heats. The CarID is comprised of the driver’s car number and class with no spaces. To maintain consistency and to eliminate any confusion during the event, Finish-Time will always format the CarID by deleting any spaces and converting lowercase text to uppercase.
Using a unique key identifier for each driver eliminates any possible registration and staging conflicts, especially during a timed heat.
To Register Drivers
- Select View > Registration, or if it is already opened, click the Registration Tab
- The driver might already be in the database, try searching for the driver in the Search Field at the top of the Registration Panel.
- If not, then Click the New Tool Bar Button.
- Enter the driver’s CarID as number and class. This must be a known Standard Class defined in the Event Properties, and not a PAX Indexed Class. The Yellow Caution Sign next to the CarID field will change to Green with a valid CarID. Then press RETURN on your keyboard. If the Caution Sign turns remains yellow or turns red, see CarID Conflicts.
- The Class drop down menu defaults to the same class entered in CarID. In addition to the declared class, the PAX Indexed Classes that your Club has established are included here, choose the class the drivers declared class.
- Enter the Drivers name, Car Make, and Model, etc.
- Clicking the Registered/Not-Registered switch will register the driver.
At this time, you may choose the drivers scheduled Work Heat and Work Position. Although, Assignments can be handled later, after event registration is closed.
CarID Conflicts
A yellow caution sign  signals that the Standard Class that you entered does not exist, and the driver cannot be registered.
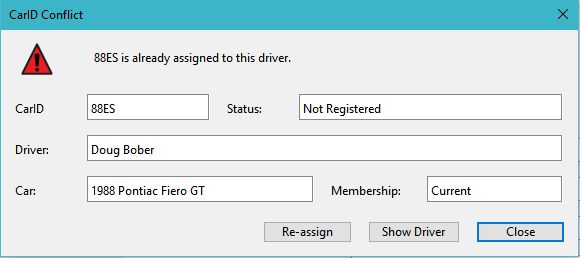
A red caution sign  signals that the CarID that you entered is already assigned to another driver. Click the caution sign for the status. Now, if the conflicting driver is NOT registered, you can Re-Assign that drivers CarID. However, if the other driver IS registered, you must choose a different CarID. No two drivers can share the same CarID.
Finish-Time will always preserve a driver when re-classing to keep the conflicting non-registered drive in the database. It does this by incrementing their number. Finish-Time will never delete a driver.
Re-Classing a Driver
A driver may be re-classed at any time, even during a timed event. Enter the new number and or class in the CarID field, them press Enter or the Tab key.
Tech Inspection
At the bottom of the Registration Panel is the Tech Inspection area where you can optionally track the drivers helmet date, Inspection Status and Notes regarding Tech Status. The helmet date is cached for each driver at every event.
Bumping
Since class bumping rules vary from National and Local Sports Car Clubs, the bumping functionality in Finish-Time is wide open and therefore, simple to use.
Select View > Bumping, or if it is already opened, click the Bump Tab
The list of eligible classes for bumping is located on the left side of the Panel. Use the drop-down menu to select the Class to bump to.
The table located on the right side of the Panel lists all registered drives and is there as a guide. You can sort this list by clicking on the headers and re-size the columns as needed.
To Bump Drivers
- Any classes that are eligible for bumping will be listed on the left side of the Panel.
- Click the Drop Down Menu of the class to Bump, navigate through the Categories to choose the class you are bumping to.
To Un-Bump Drivers
- Any classes that are eligible for un-bumping will be located on the left side of the Panel.
- Click the drop-down menu and select [----].
- Or, to un-bump all drivers, click the Reset Tool Bar Button.
To Reset All Bumps
Clicking the Reset tool bar button will reset any bumped drivers back to their respective declared classes.
To Auto Bump
New for Finish-Time 4.1 is the Auto Bump function. By default, this is configured with a custom bump schedule as an example, but can be re-purposed with your Bump Table. The bump follows each class table in linear fashion, starting with the top most schedule. See Auto Bump configuration for details and instructions to configure your own custom Bump Table.
Clicking this button will bump all classes following the bump schedule until the minimum number of cars required for class is achieved.
Deleting Drivers
Drivers in the Season Database can only be deleted in they have not been registered for any events. This option is provided if you get a request from a member to remove them from your database, you can. They can be deleted in the Registration or Results Panels. Just click the Delete button in the Tool Bar, with the driver in view.
Finish-Time will re-calculate the Bump if that Driver was bumped to another class.
An optional way to delete a driver is to right-click on the driver listed in the Drivers List, and choose Edit > Delete Driver.
Assignments
Since Work Assignments and Grid Positions vary with National and Local Clubs, the Assignments Function Panel enables you to assign participants to Run Heats, Work Positions and Grid Positions in virtually any fashion. To group drivers into Classes or sort by Number, click on any of the table headers to sort them as required for selection. They can be assigned individually at Registration or globally using the Work Assignment tool.
To Assign Run Heats, Work and Grid Positions to Drivers
- Select View > Assignments, or if it is already opened, click the Assignments Tab
- Use the list of participants to select one or more drivers that will be assigned to that heat. Click on each of the headers to sort the list for better viewing.
- Choose the Heat Number and or Work Positions to assign workers to.
- Click the Grid cell for the driver you need to assign a grid Position too, then click again to active it and enter their Grid Number. Use the Keyboard Up or Down Arrow keys to navigate to the next driver and enter their Grid Number.
Event Properties
The Event Properties are the specific attributes for current competition event. These are the same properties are copied from the Event Manager, and are independent of it. All of these properties are fully editable if required. In most cases you will not need to change these, but the option is always there.
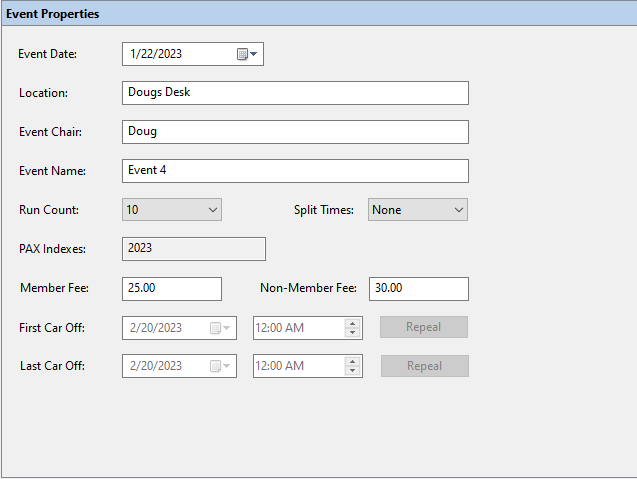
To edit or view the Event Properties, Select View > Event Properties from the main menu. All changes here are implicit.