Timing and Scoring
The Timing Function Panel is Finish-Time’s Timing and Scoring interface. Here is where you Stage and Penalize drivers and generally manage all timing aspects of the event. It consists of a Stage/Start table at the top, complete with a searchable Stage Driver field. The driver listed at the top of the Stage/Start list will be the next driver to Finish. Newly staged drivers appear below the previously staged driver.
Below Stage/Start is the Finish table. As car passes through the finish, they will appear at the TOP of the Finish table. Cars listed here can be staged again, penalized, and flagged for a rerun as needed. When you stage a car that has previously run, the car will be removed from Finish table. Penalties applied to a driver listed in Finish, only apply to their LAST run.
In this Article
Staging
Before sending the first car off, it is recommended that you perform a Preflight Check of all of your hardware. Ensure that the start and finish photo heads are properly aligned and the serial port cable is firmly attached to the timing computer. Finally, test communication between the timer and your computer.
To Stage a Driver
It is important that the sequence of cars staged also reflects the sequence in which they are staged in Finish-Time to ensure that you are following the First In, First Out concept. There are several different ways to stage cars, there are also provisions for re-ordering them or removing them from this list.
The simplest way is to enter their CarID in the Stage Field, then hit enter. That driver will appear in the Stage/Start table on the Timing Tab. The newly staged driver will be listed below the driver previously staged in the Stage/Start table. You may Stage as many drivers or groups of drivers as you want.
- Enter the driver’s CarID in the Stage Driver field located in the Stage/Start list, and press ENTER on your keyboard. The Stage Driver field is searchable by First Name, Last Name, Car Make, and Model.
- Double-click a driver in the Drivers List
- Drag and drop one or more driver(s) from the Drivers List to Stage/Start
- Right-click a driver in the Drivers List and choose Stage
- Right-click a driver at Finish and choose Stage.
- Scan the drivers Barcode on their vehicle or helmet.
The newly staged driver will be listed below the driver previously staged in the Stage/Start table. You may Stage as many drivers or groups of drivers as you want.
Re-ordering Staged Cars
Cars listed at the Start may be re-ordered by dragging the car to it’s new position in the Stage/Star table. This is especially help full when staging multiple cars at once.
Insert Staging
To insert a car between drivers listed at Stage/Start, select a car in the Drivers List, then choose where you want to insert them at Stage/Start. Right click, then choose Insert.
Scratching Staged Cars
Cars may be Scratched from Stage/Start by first, selecting the car then, click the Scratch toolbar button. Cars listed in the Finished list cannot be Scratched.
Barcode Staging
If you haven't configured your Barcode Reader, please follow these instructions first.
With the numerous types of barcode printers on the market, we can't get into specifics regarding printer configurations. Most barcode printers should also include the needed printer drivers for your host computer.
Configuring a second printer for barcodes is accomplished by clicking View > Report Setup, then choose the Barcode Labell button in the report viewer. The page view will default to letter sized paper, choose the Page Setup tool bar button, and select the label size you are printing. On MS Windows, you will have to experiment with the best margins for the label size you are using.
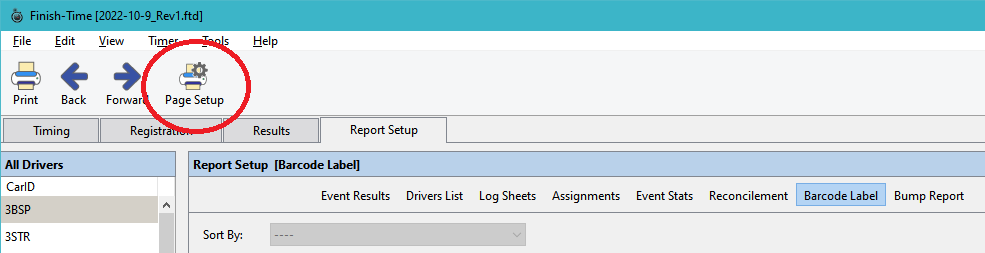
With the label printer connected, print the test label to confirm layout and that the content fits the label. If you update each driver's Helmet Certification and Date during registration, that information will also print on the label. The idea is that the Barcode Label could serve as a Helmet Inspection sticker too.
While scanning barcodes, Finish-Time will send one of two responses back to the scanner. An single beep will follow shortly after a scan is made. This confirms that the driver was found and staged. The other response is a rapid multiple beep noting that either the driver was not found, or not registered. Most barcode scanners beep once when the scan is complete, if such is the case with your scanner, then listen for the "Echo" beep in response.
Penalizing Drivers
Drivers listed at Stage/Start and Finish can be penalized during an active run heat.
Applying a Penalty
- Click the driver in the Stage/Start or Finished list.
- The O/C and DNF penalty toolbar buttons work like an On/Off switch. Click once to apply the penalty, click again to clear the penalty. The Pylon penalty button increments the number of pylons by one. The number listed is the quantity of pylons displaced, not the penalty time.
Clearing a Penalty
- Click the driver in the Stage/Start or Finished list.
- Click the None toolbar button removes all penalties for that run.
- F2 Off Course
- F3 Did Not Finish (DNF)
- F4 Add Pylon Penalty
- F5 Clear Penalty
Reruns
To facilitate reruns declared by the event Chair, Finish-Time enables you to easily flag any driver listed at Finish. The next time that driver takes a run, their new time will replace their current run time. Just like the penalty buttons, the Rerun toolbar button works like an on/off switch.
Flagging a Rerun
- Select the driver in the Finished list
- Click the Rerun toolbar button. "RERUN" will appear in the "Penalty" field.
Driver Finished, with no cars staged
It’s bound to happen. One or more drivers will finish when they were never Staged. Orphaned runs will appear in the Finished list, highlighted in red.
Assign a driver to a Orphaned Finish
- Select the driver in the Drivers List
- Drag the driver over-top of the Orphaned run in the Finished List, then drop the driver in place.
ETA Calculator
Finish-Time will attempt to calculate when the Last Car Off will take place, signaling the end of the timed event. It does this after the first seven finishes. The ETA time appears at the bottom of the window and will update throughout the day depending on the number of cars finishing within a certain time. Note that after a worker changeover, the ETA might off by several minutes. This is normal and will correct it’s self after a few more runs.
Editing the Results
The Results Function Panel serves dual purposes, it is the only way to edit drivers times and penalties, and displays the Comparison Table listing the position of each driver in class and shows the difference in seconds between the listed driver and their competitors. It’s the same table found on the Announcer Screen. Raw times may be edited at any time, even during a timed heat.
To edit a drivers Raw Time
- Select View > Registration, or if it is already opened, click the Results Tab
- Clicking the Back or Next buttons on the toolbar will scroll through the list of drivers. You can also drag the driver from the Drivers Panel and drop them anywhere on the Results Function Panel.
- Change the time, or click the Penalty Menu to change the drivers penalty
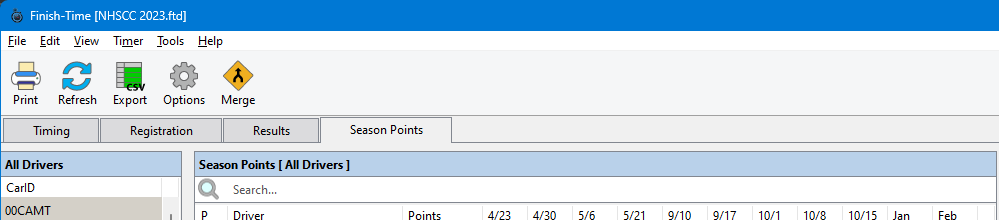
Season Points
The Season Points Tab is where you can manage the accumulation of Season Event points. Event points are internally calculated based on each driver placing in class, using the Points System that you configured. With the optional Club Points module enabled, additional club activities like meetings and event chairmanship points are entered here as well.
Options
Clicking the Options tool-bar button reveals a menu of sort and viewing options.
- All Drivers
- Members Only
- Active Drivers
- Inactive Drivers
- Sort by Points
- Sort by Last Name
These options are honored here at the Season Points table, CSV Export and HTML export.
Export
Clicking the Export tool-bar button reveals a menu for Exporting the Season Points.
Merge
In the event that you end up with a driver who has been registered under two different Profiles, that is, you now have a member entered into the Season Database twice, their Event points will be split across these two entries. That breaks their points accumulation for the current season. The Merge tool-bar button enables the merging of these two entries into one.
- Locate the two Profiles you wish to merge, and select each by clicking the first entry, press and hold the Control Key, then select the other.
- Click the Merge tool-bar button.
- Choose which Profile you want to keep, by clicking the Preserve switch located to the left of each profile listed.
- Click OK to commit the merge.
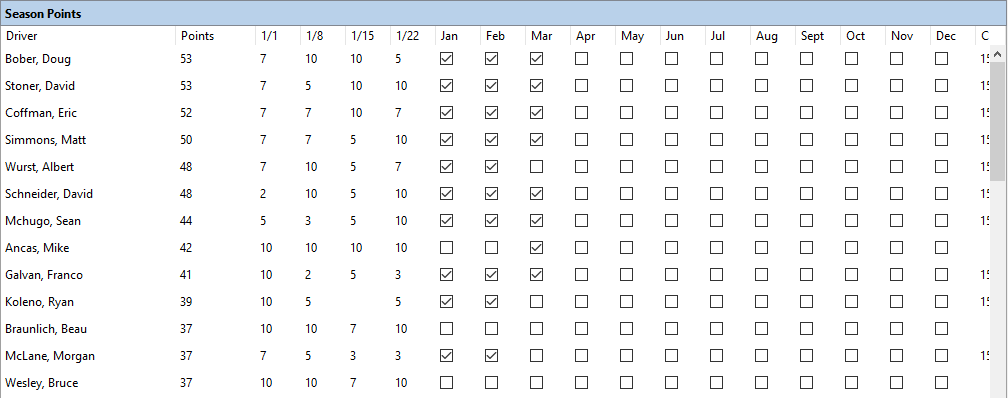
For clubs that track meeting points, and any other points for chairing an event, etc. you can update those points here by clicking the check-boxes (circled in red) located in the Months columns. For your other optional points, just enter the points value in each of the columns as needed.
